If you are interested in any equipment I use to record or use in my videos, I try to keep an updated list here: https://www.amazon.com/shop/howtwos101
If you are currently replacing a hard drive on your laptop or desktop computer, I highly recommend using an SSD. They are faster and more reliable, and their cost is significantly reduced. For example, here's a cheap 500GB one on Amazon: https://amzn.to/2G5xTwW
This is a general video on how to remove the hard drive from a laptop. These steps may be a little, and in some cases completely different, from what you need to do to remove your hard drive. But the general idea is the same, so if you follow these steps you will be able to replace your hard drive.
First, get a service manual for your laptop. Some are very easy to find, others extremely difficult. You should, however, be able to find a free copy of your somewhere on the Internet. An example is this for my laptop (Inspiron 17R Special Edition 7720): ftp://ftp.dell.com/Manuals/all-products/esuprt_laptop/esuprt_inspiron_laptop/inspiron-17r-se-7720_Owner%27s%20Manual_en- us.pdf
Next, decide whether or not you want to use an ESD strap. I've never used one and never had a problem, but you might be the one in a million for whom this is a problem. So if you want to live dangerously, just touch something metallic to discharge static electricity before working on the laptop and wear shoes. If you want to use an ESD wristband, here is an example of what you will get: http://www.amazon.com/Belkin-Anti-Static-Wrist-Adjustable-Grounding/dp/B00004Z5D1/refsr_1_1?ieUTF8&qid1376016306&sr8-1&keywordsESDstrap Basically , this makes it much more difficult to create a static charge that you could shock a component with.
Next, turn off the laptop and remove all power sources. This includes the wall outlet and battery.
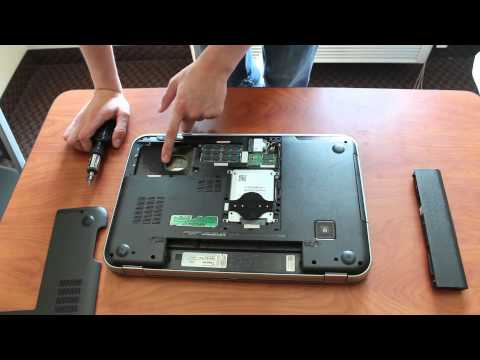
After that, it's time to disassemble the laptop to access the hard drive. This can include several different methods. The simplest method is the one shown in the video, where the hard drive is located under the covers on the bottom of the laptop. Unfortunately, not all laptops are made this way. The next /"class/" is about as simple as covers, where the laptop sits in a slide-out tray on the side of the laptop. Basically you will need to remove 2-4 screws and then a tray will slide out from the side containing the hard drive. This is common on a few laptops, like Thinkpad/Lenovo T40, T42, etc., and some Dell laptops like the XPS M1530 and XPS M1330. The next /"class/" would be having to remove the entire bottom to access the hard drive. A good example of this is the 2011 Macbook Pro, where you have to remove 6 screws and then the whole bottom comes out. Another version is to remove all the screws from the bottom, then remove the keyboard, then remove the screws from under the keyboard, then separate the laptop into 2 halves. This is the worst version to deal with and can be seen on a number of Acer models, older HPs and many Netbooks.
So, once you know how to access the hard drive, you can proceed to disassemble it. Make sure you have a system for knowing which screws go where. One method I use is to take a video of the disassembly process that I can review to put it back together. Another method is to draw a rough picture of the laptop and put double-sided tape on it. Then, every time you remove a screw, tape it to the photo where it goes.
So now you can start removing the screws. Make sure you apply a decent amount of direct downward force, but not enough to break the plastic. If you try to apply pressure at an angle or don't use enough pressure, you are much more likely to strip the screw and create huge problems for yourself.
Some screws need to be removed from the laptop entirely, while others remain embedded in the plastic. So if a screw seems stuck, don't remove the tapered nose and track on it. Usually the trick is if it's hard to get outside, he's supposed to stay inside.
After removing the screws needed to access the hard drive (you may need to repeat this step and the last one several times if your laptop has layers to go through), gently pull on the plastic covering to remove it. Some plastic coverings will have clips that need to be removed gently, so apply a little force to the stuck areas to check for clips, but generally speaking, if the plastic doesn't come apart easily, either it doesn't is not supposed to come apart, or you forgot to remove a screw.
Youtube is now telling me that my description is too long, so for the full text description check it out on my website at http://www.allhow2s.com/how-to-remove-a-hard- drive-from-a. -laptop/
Please take the opportunity to connect and share this video with your friends and family if you find it useful.
No Comments